Thursday, December 2, 2010

Sweet Potato Cake with Cream Cheese Frosting


Is it bad that I am extremely excited about the fact that I have only ONE more day of classes left for this semester? I am literally counting the days until this semester is over. To any students reading this: you think you're excited about winter break? Hah! I'll bet you anything that your professors/teachers are even more excited.

This semester has been an eye-opening experience: challenging and interesting to say the least. Today, I had a student cry in my office. Now before you start thinking that I'm a ruthless professor, I should point out that this student has stopped submitting assignments after the 3rd week of classes. Every few weeks he would send me an email about how he was sick, or his mom was sick, or how work was very busy, and how I shouldn't worry, because he he will submit everything within the next two days, really he will, he promises this time. Never happened. So of course, when he came to my office today, I told him that since he had not submitted 90% of the assignments and had not shown up to class, he would fail both courses.

I knew he'd be upset, but I was not prepared for the next part.
He began to explain to me that his mother had a stroke and paralyzed the left side of her body, so he spent this semester taking her to the doctor and to physical therapy. Also, his step father was a cruel man who treated them very badly and he was now helping his mother look for a divorce lawyer.

Honestly, I didn't (and still don't) know what to say. I want to believe him, I really do, but I have spoken to other professors in my department about this student and they tell me that it's always the same story with him: 3 weeks or so into a class, he ceases to submit any assignments or show up to class. He is in his third year of college, so is it possible that he's had these problems at home this entire time? Or is he just pulling out the waterworks in my office so he can later go home, drink a forty, and congratulate himself on once again fooling another newbie professor?...I'm not sure. If it's the former, how can I be sure he's telling the truth, and more importantly, should I be doing something to help?

It was hard for me to see him cry and wipe his tears in my office, and I sat there not really knowing what to do or say. I tried my best to show support, but couldn't help but think that I wasn't not prepared for this kind of thing. Sure, I can plan lectures, present material, and create assignments. But grad school did not teach me how to be a therapist, and more and more, I'm starting to wish that it sort of did.

Earlier this semester, I had a student email me about why she couldn't submit an assignment on time: earlier week, for the first time, she had met the man who had sexually abused her as a child. Within the same week, her suicidal ex had contacted her and needed her help. Of course I gave her an extension, but I wasn't sure how to do more than that. I assured her that she could talk to me about her problems, but she never did. And that was that. I really don't know how to bring this topic up with her, or if she even wants me to.

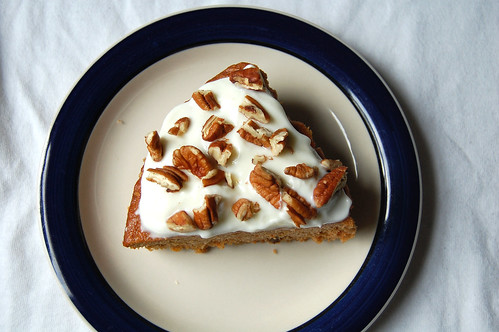
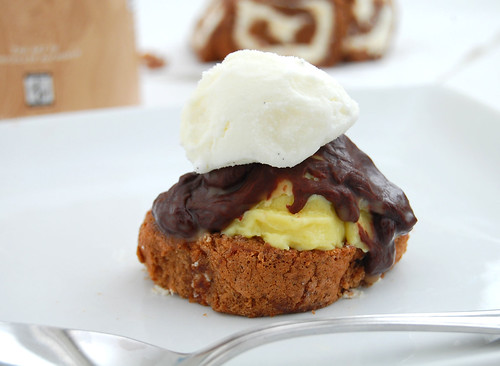
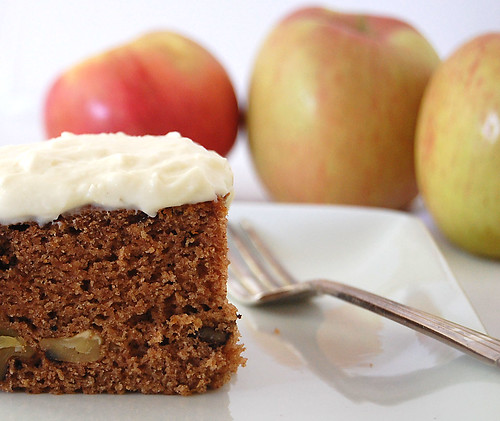
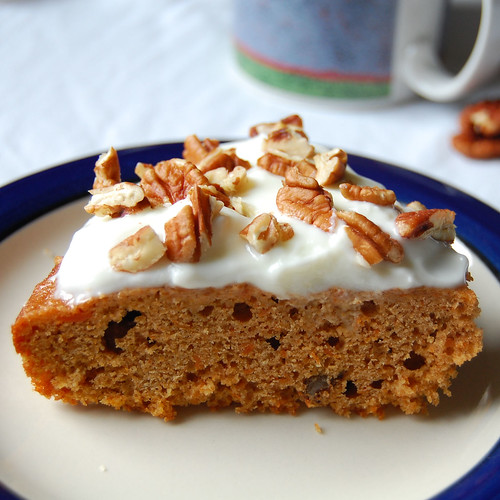
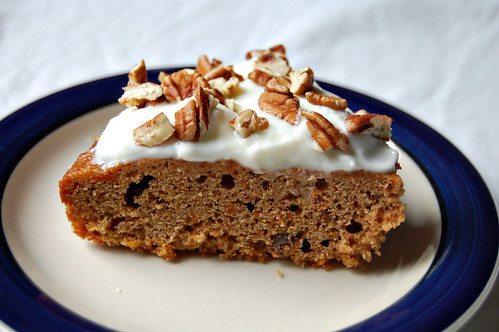
Wow. This is becoming a very serious (and long) post. Let me get to the most crucial matter...this cake. ;) I made it a few weeks ago when my parents and grandmother came to visit and they loved it. Me? I thought it was good but slightly on the dry side. This is probably not a fault of the original recipe, but my modifications (I always try to healthify the desserts I make for my parents). I replaced some of the oil with applesauce and some of the all-purpose flour with whole wheat pastry flour. Next time, I will up the oil to applesauce ratio and hope for a moister cake.

Sweet Potato Cake (adapted from Epicurious.com)
Cake

* 4 8-ounce red-skinned sweet potatoes(yams)
* 2 cups whole wheat pastry flour
* 3/4 cup all purpose flour
* 2 teaspoons ground cinnamon
* 1 1/4 teaspoons ground allspice
* 1 teaspoon baking powder
* 1 teaspoon baking soda
* 1/2 teaspoon salt
* 2 cups sugar
* 1/2 cup applesauce
* 1/2 cup vegetable oil
* 4 large eggs
* 1 teaspoon vanilla extract

Frosting
Recipe here (without the dulce de leche)

For cake:
Pierce sweet potatoes with fork. Microwave on high until very tender, about 8 minutes per side. Cool, peel and mash sweet potatoes.

1. Position rack in center of oven; preheat to 325°F. Generously butter 2 9in cake pans.
2. Sift flours, cinnamon, allspice, baking powder, baking soda and salt into medium bowl.
3. Measure enough mashed sweet potatoes to equal 2 cups. Transfer to large bowl. Add sugar, applesauce, and oil to sweet potatoes; using electric mixer, beat until smooth. Add eggs 2 at a time, beating well after each addition. Add flour mixture; beat just until blended. Beat in vanilla. 4. Transfer batter to prepared pans. Bake cake until tester inserted near center comes out clean, about 1 hour 5 minutes.
5. Cool cakes in pans on rack 15 minutes. Using small knife, cut around sides of pans to loosen cake. Turn out onto rack; cool completely. Frost with cream cheese frosting.

Wednesday, November 17, 2010

Baklava

Wow oh wow. Words cannot even begin to describe how incredibly touched I was to see all the supportive comments on my previous post. Thank you so much everyone for all your kind words. Reading your comments really helped lift my spirits during a time when I was feeling very lost.

Apparently I worried a few people with my last post, and I want to apologize. I may have been a bit dramatic. I was going through a very rough patch with my teaching and I may have made it seem worse than it really is. In all honesty, I do enjoy teaching - for the most part. It's frustrating when my students slack off and show little interest in their work, especially when I think about all the effort I put into my classes - I work about 9-10 hours per day during the week and at least 6 hours per day during the weekends. Of course, I have some amazing students, who are engaged and appreciative, but it's difficult to ignore the ones who aren't. Here's an example...

A few weeks ago, I gave a midterm exam for my Operating Systems course (yes, I teach Computer Science and yes, I am a nerd). Here is one of the questions on the exam:

In the context of Operating Systems what is atomicity?

And here is the response from one of my "less-engaged" students:

Atomicity probably has something to do with how processes work with eachother (?? I dunno, maybe? I got nothing).


Uhm...OK?

Let me mention that this student comes to class everyday, sits in the front row, and...falls asleep. EVERY DAY. EVERY. SINGLE. DAY. I don't mean dozing off every few seconds. I mean full on sleep. Frustrating, is all I can say. Why would you even write "I dunno, maybe, I got nothing" on an exam? Why oh why?

Then there are the excuses. The (what seems like) thousands and thousands of excuses. I've been teaching for less than a semester and I feel like I've heard them all already:

-"I wanted to come to class, really I did, but I accidentally set my alarm for 8pm instead of 8am"
-"I meant to submit the homework, but somehow I just totally forgot"
-"I really wanted to hand in this assignment, but I just fell asleep instead"

These are not jokes. These are actual excuses I have gotten from students. Actual excuses. From real-life students. Frustrating.

OK, I'm done ranting for now. There will be more later, I promise.

I know I'm complaining a lot, and really I shouldn't be. There are so many wonderful things going on in my life and I too often let myself lose sight of them. Remember the BF? Well, he isn't a BF anymore, he's now an F - as in fiancé. And he's officially moving here in January. :)

Here are some random pictures...


I'm also extremely blessed to have the most amazing family in the world. Despite my everlasting grumpiness they've made the long trek from their little pockets in the country to visit me here in the middle of nowhere (Ok, it's not really in the middle of nowhere, I'm just being dramatic again). Which finally brings me to this baklava. I cannot take credit for this dish, because I didn't make it or even help make it. My sister did all the work when she visited me a few weeks ago, and I'm so glad she did. This is an amazing dessert made with wonderful ingredients: walnuts, honey, lemon, and delicate sheets of phyllo. Use a pastry brush to apply thin layers of butter or olive oil, and you actually have a (somewhat) guilt-free dessert. Thanks Didi. :)

Baklava (adapted from allrecipes)

Ingredients

* 1 pound chopped walnuts
* 1 teaspoon ground cinnamon
* 1 (16 ounce) package phyllo dough
* 1/2 cup butter, melted or olive oil (may not even need this much, see below)
* 1 cup white sugar
* 1 cup water
* 1/2 cup honey
* 1 teaspoon vanilla extract
* 1 teaspoon grated lemon zest

Directions
1. Preheat oven to 350 degrees F (175 degrees C). Butter a 9x13 inch baking dish.
2. Toss together cinnamon and nuts. Unroll phyllo and cut whole stack in half to fit the dish. Cover phyllo with a damp cloth while assembling the baklava, to keep it from drying out.
3. Place two sheets of phyllo in the bottom of the prepared dish. Brush with thin layer of butter. Sprinkle 2 to 3 tablespoons of the nut mixture on top. Repeat layers until all ingredients are used, ending with about 6 sheets of phyllo. Using a sharp knife, cut baklava (all the way through to the bottom of the dish) into four long rows, then (nine times) diagonally to make 36 diamond shapes.
4. Bake in preheated oven 50 minutes, until golden and crisp.
5. While baklava is baking, combine sugar and water in a small saucepan over medium heat and bring to a boil. Stir in honey, vanilla and lemon zest, reduce heat and simmer 20 minutes.
6. Remove the baklava from the oven and immediately spoon the syrup over it. Let cool completely before serving. Store uncovered.

Friday, October 22, 2010

Moroccan Chickpea Stew

Have you ever watched Ruth Reichl's Gourmet Adventures on PBS? What an awesome show. Ruth goes all over creation trying some very unusual and interesting foods in different locations. Back when I actually had a television and the time to watch it, her show was a regular on my Saturday morning must-see lineup - right after Rick, Lydia, and 1 hour of Mr.Kimball.

In one episode, Ruth traveled to Morocco and watched the locals make an assortment of traditional Moroccan dishes. The episode inspired me - the following weekend I made this stew. This was several months ago, when I had the energy and time to cook elaborate meals, when cooking was fun and exciting, and not the stressful chore that it is now.

Do I sound bitter? It's because I am and I'm just going to say it. I'm going to bitch and whine and complain because I can. It's something I've never really done on this blog because in the past, I've always been too worried about pleasing my readers and attracting new ones...I mean who wants to read a bitchy blog, right? So my motto has been to always show a happy face.

But I don't care anymore. If I can't complain on my blog, then I can't complain anywhere. So here goes: I'm sad. I don't like teaching. I hate being away from people that I love. It's Friday night and I'm sitting at home. Very few things excite me nowadays. I feel hopeless and helpless all the time. I feel like a weakling for feeling this way, but I can't help it. I cry at least 3 times a week and usually more than that. I'm not sure what I'm doing here. Have you had enough? Good, because I'm done, for now that is.

Well, except for the recipe part, which is below. Make this stew. It's amazingly good - I made it in April and I can still remember how good it was. I have 2 butternut squashes sitting in my quiet kitchen waiting to be turned into this stew. Pray for me that they're not sitting for too much longer.

A preserved lemon that went into the stew.
Stew ingredients in pot.

Finished stew.

Squash and Chickpea Moroccan Stew (adapted from Aida Mollenkamp)

Ingredients

* 1 tablespoon unsalted butter
* 1 tablespoon olive oil
* 1 medium yellow onion, small dice
* 4 medium cloves garlic, thinly sliced
* 2 teaspoons ground cumin
* 1 (3-inch) cinnamon stick
* Salt and freshly ground black pepper
* 1 pound butternut squash, large dice
* 3/4 pound red potatoes, large dice
*1 bunch swiss chard, chopped (my addition)
* 2 cups low-sodium vegetable broth
* 2 cups cooked chickpeas, drained
* 1 (14-ounce) can diced tomatoes, with juices
* Pinch saffron threads, optional
* 1/2 preserved lemon, finely chopped
* 1 cup brined green olives
* Steamed couscous, for serving
* Fresh parlsey leaves, roughly chopped, for garnish
* Toasted slivered almonds, for garnish

Directions

Heat butter and olive oil in a 3- to 4-quart Dutch oven or heavy-bottomed saucepan with a tight fitting lid over medium heat. When oil shimmers, add onion, garlic, cumin, and cinnamon, and season with salt and freshly ground black pepper. Cook, stirring occasionally, until spices are aromatic and onions are soft and translucent, about 5 minutes.

Add squash, potatoes, and swiss chard, season with salt and freshly ground black pepper, stir to coat, and cook until just tender, about 3 minutes. Add broth, chickpeas, tomatoes and their juices, and saffron, if using. Bring mixture to a boil then reduce heat to low. Cover and simmer until squash is fork tender, about 10 minutes.

Remove from heat and stir in preserved lemon and olives. Serve over couscous garnished with parsley and almonds.

Sunday, September 26, 2010

Swiss Roll Bombe

Wow. It has been a loooong time. Ready for my sob story? Because here it comes...
Over the last few months I've come to realize how precious is this thing that we call time. Time! What a sneaky thing you are. A few months ago I had so much of you -- almost too much. It was March and I had an offer for a job that didn't start until the end of August. I had 6 whole months to relish California while I slowly finished up my thesis. And now look at me...I barely have enough of you to sit down and write a post.

The last few months have been some of the craziest in my life. I went from being a graduate student on the verge of completely losing all motivation to an assistant professor. Sounds like a big change, but honestly, I don't think much has really changed. Sure, I'm in a different location, with a (dare I say it) real job, and a real (non-stipend) salary. But inside, I am still the same grad student -- stressing over deadlines, working late hours, and trying to hold on to every last bit of motivation I can find. It's been a challenge to say the least.

The hardest part is being away from those I love. I am in the middle of the country (literally) thousands of miles from anyone I love and sometimes I can't help but wonder if it's really worth it. Honestly, I'm still not sure. But this is what I've got myself into, so I might as well savor it while I've got it.

OK, enough rambling. I'm ready to talk food. I'm almost embarrassed to post this, but I'll do it anyway. This was supposed to be my submission for some past Daring Bakers challenge -- so long ago, I don't even remember the month, and right now I'm too lazy to look it up. The challenge was to create a Swiss bombe: basically cake-covered ice cream. That's right: Cake. And. Ice Cream. Together. Dessert doesn't get much better than this.

The swiss roll cake was really fantastic. Of course mine looked less than perfect, but the taste was phenomenal. Light and moist with the perfect amount of sweetness. I made two flavors of ice cream: vanilla bean and french vanilla (sorry, forgot which recipes I used), and added a layer of chocolate ganache. I made a mini bombe and a deconstructed version. Personally, I liked the deconstructed version better. But that's just me sometimes: disorganized and random (sshh...don't tell my students).

I also want to thank all my readers who left me the most endearing comments on my last post. After not blogging for so many months, I missed it terribly, and now I know why. Reading your comments and knowing that someone out there actually (somewhat?) cares about what's going on in my kitchen means so much to me. Seriously, your comments really touched me.
I really hope to be blogging regularly again soon.

Here are the recipes for the cake and ganache.

Saturday, July 31, 2010

A Quick Note

Lovely readers -- I know I've been away for a while. Things have been crazy busy around here. I've been packing, planning, and preparing for my big move across country, and it's been taking an insane amount of time. I miss cooking, posting, and reading and commenting on all my favorite blogs. I'll be moving mid-August, then starting my new job about a week later, so things will be hectic for a while. It's hard for me to say right now when I'll be blogging like the good ol' times again, but hopefully it won't be too long. I'm looking forward to catching up with you all soon.

-ms. meanie

Sunday, July 11, 2010

Île Flottante (Floating Islands)

I'm too cheap to pay for cable, but I always say that if the people at Comcast made me a deal where I just pay for one channel, they would have me sold. Of course, that one channel would be FoodNetwork and the one show I'd be sure to watch is Barefoot Contessa.

A few months ago when I visited my parents (who apparently are not to cheap too pay for cable), I watched Ina Garten make an Île Flottante. The dessert looked so elegant and different than anything I'd ever made, I was instantly intrigued. Fluffy meringues that are ever-so slightly baked floating on top of a rich and boozy sauce? Yes please!

This dessert was definitely interesting. I know that's not the most appetizing word to describe a dessert, but it seems the most accurate to me. The crème anglaise was fantastic: I spiked it with a touch of Pisco (a Peruvian brandy) which complemented the vanilla extract very nicely. The caramel was tasty as well, albeit somewhat tricky to work with. The meringues were a different story. They baked up beautifully, but me being the idiot that I am, decided to refrigerate them until I was ready to assemble this dessert. Yes, I know Ina would want to rip out her hair (or maybe mine) if she knew I committed this cardinal sin against meringues, but I really had no choice. I simply did not have enough time to make the entire dessert, plate it up prettily, and take pictures before the sun went down.


Despite the chewy and cold meringues, I enjoyed this dessert. I'm also pretty confident that had I not chilled the little meringues to death, it would have been the luscious dessert Ina intended it to be. Maybe the next time I have enough time (and sunlight), I will make this dessert again. In the meantime, anyone out there work for Comcast? Make me a deal, and I'll make this dessert for you (sans the chewy meringues, of course).


Île Flottante (adapted from Ina Garten)

For caramel (about 1 cup):
*1 1/2 cups sugar
*1 cup water
*1/2 teaspoons pure vanilla extract

For meringues (the recipe says this will make 12 meringues, but I got more than twice this amount):
*8 extra-large egg whites, at room temperature
*1/8 teaspoon kosher salt
*1/4 teaspoon cream of tartar
*1 cup sugar

For crème anglaise (2 cups):
*4 extra-large egg yolks
*1/2 cup sugar
*1 teaspoon cornstarch
*1 3/4 cups scalded milk
*1 teaspoon pure vanilla extract
*1 1/2 teaspoons Cognac or brandy

Directions:
1. Preheat the oven to 250 degrees F. Line 2 sheet pans with parchment paper or a baking sheet.

2. For the caramel , heat 1 1/2 cups of the sugar and 1/2 cup water in a small, heavy-bottomed saucepan until the sugar dissolves. Cook over medium heat until the syrup turns a warm caramel color. Don't stir, just swirl it in the pan. Off the heat, add 1/2 cup water and 1/2 teaspoon of the vanilla; be careful, the syrup will bubble violently. Stir and cook over high heat until the caramel reaches 230 degrees F (thread stage) on a candy thermometer. Set aside.

3. For the meringues , beat the egg whites, salt, and cream of tartar in the bowl of an electric mixer fitted with the whisk attachment on medium speed until frothy. Turn the mixer on high speed and sugar. Beat until the egg whites are very stiff and glossy. Whisk in the vanilla. With dessert spoons place 12 mounds of meringue on the parchment paper and bake for 20 minutes, or until a cake tester comes out clean.

4. For the crème anglaise , beat the egg yolks and sugar in the bowl of an electric mixer fitted with the paddle attachment on medium-high speed for 3 minutes, or until very thick. Reduce to low speed, and add the cornstarch. With the mixer still on low, slowly pour the hot milk into the eggs. Pour the custard mixture into a saucepan and cook over low heat, stirring constantly with a wooden spoon, until thickened. The custard will coat the spoon like heavy cream. Don't cook it above 180 degrees F or the eggs will scramble! Pour the sauce through a fine strainer, add the vanilla extract, Cognac or brandy, and chill.

For serving, pour creme anglaise on the bottom of individual plates. Place a meringue on top of each serving, drizzle with caramel sauce, and serve.

To make a day or two ahead, leave the caramel at room temperature and refrigerate the creme anglaise. Reheat the caramel and bake the meringues before guests arrive and assemble the desserts just before serving.

This dessert is also my attempt to make up for missing last month's Daring Bakers challenge. I know it is not the Chocolate Pavlova challenge hosted by Dawn, but it does consist of a few of the same components: baked meringues and creme anglaise. Click here to see the actual Daring Bakers creations for June.

Wednesday, July 7, 2010

Garlic Hummus

Homemade Hummus. Did you see this coming? After making tahini sauce, it was only natural to use it in a hummus recipe.

As a vegetarian, I always find it a challenge to come up with different fillings for sandwiches. Hummus, my friends, is the ultimate solution. It is easy to make, delicious to eat, and packed with protein. I made a big batch of this stuff almost 2 weeks ago, and I've been eating it ever since. Just freeze it in portions and let it defrost the day before.

The raw garlic in this recipe gives the hummus a nice kick. Be warned however, that this means you will have garlic breath. I have garlic breath almost every single day, so I'm now used to it, the BF is too. Not having to worry about garlic breath -- one of the best things about a long-term relationship.

The measurements here are estimates. The great thing about this recipe is you can add more of this and less of that depending on your tastes. Add some heat with a bit of cayenne, richness with more oil, or (my favorite) an extra kick with more garlic. Mmm...garlic breath.

Hummus Recipe (adapted from Simply Recipes, makes about 2 cups)
* 3 garlic cloves, minced and then mashed
* 1 15-oz cans of garbanzo beans (chickpeas), drained and rinsed, OR about 2 cups cooked garbanzo beans (keep can or cooking liquid)
* 1/3 cup of tahini
* 3 tablespoons freshly squeezed lemon juice
* 1/4 cup liquid from can of beans or cooking liquid from beans (I threw this out by accident so just used water)
* 3 tablespoons olive oil
* 1/4 teaspoon of salt

In a food processor, combine all ingredients. Process until smooth. Add more olive oil if necessary to achieve desired consistency.

Thursday, July 1, 2010

Homemade Tahini

Some things just do not photograph well. Let me rephrase that -- there are some things which I just cannot photograph well. Like homemade tahini. I know this looks like a pile of slop, but try not to focus on that part. Instead, direct your attention to my brand new mortar pestle (oooh, ahhh). You like?

I've used store-bought tahini once in the past for making hummus. Although it was tasty and all, I had to buy a whole can of it when I needed only a few tablespoons. Sadly, much of it went to waste, which pains me because this stuff ain't cheap.

So this time, I decided to make it myself and it was surprisingly simple. Yes, mashing it up in the mortar pestle requires a bit of elbow grease...but that's why we work out, no? To be better cooks, right? Of course!

Step 1. Get out some sesame seeds and toast them until nice and well, toasty.


Step 2. Put them, along with some olive oil, in your lovely new mortar pestle. No picture here, sorry, got a bit anxious.

Step 3. Mash the bejeezus out of them.

Since I used a small amount of sesame seeds (about 1/4 cup) I made this in a mortar pestle. For a larger batch, you could certainly save some time and effort and make this in a food processor.

Homemade Tahini (adapted from Joy of Cooking and here)
* 1/4 cup sesame seeds
* 3 1/2 tablespoons olive oil

1. Preheat oven to 350. Toast sesame seeds for 5-10 minutes, tossing the seeds frequently with a spatula. Check often and make sure they do not burn!! Cool for 10 minutes.
2. Mash the seeds and oil with a mortar pestle until mixture is somewhat smooth and thick. The mixture will still be slightly lumpy.

Saturday, June 26, 2010

Homemade Crème Fraîche

This will be a quick post with a simple recipe. Crème Fraîche is a thickened cream that has recently gotten much press throughout the food blogosphere. It is similar to sour cream, but less tangy with an amazing but subtle nuttiness. Grocery stores like to overcharge you for this stuff, which is silly to me, since it is very simple (and kind of fun) to make at home. After making this recipe and tasting how delicious the homemade version is, I will never consider buying this from a store.

I have also tried this other recipe that calls for heating the heavy cream, and it did not work for me. Instead of crème fraîche, I ended up with sour heavy cream - definitely not good eats. Below is the simplest recipe I have found for homemade crème fraîche, and it comes out beautifully. No heating, no fear of burnage, just mix, wait, and enjoy.

Homemade Crème Fraîche (from Dorie Greenspan)

1 cup heavy cream
1 tablespoon buttermilk or plain yogurt (I used yo

1. Put the cream and buttermilk or yogurt in a clean jar with a tight-fitting lid. Cover the jar and shake for a minute or so.
2. Put the jar on a counter in a warm location (I placed it on top of my water heater) and leave it for 12 to 24 hours, or until the cream thickens slightly.
3. When the cream thickens, place the jar in the refrigerator and let it chill for 1 day.

Monday, June 21, 2010

Applesauce Spice Cake

Can you tell I've had some free time on my hands? After making all the edits on my thesis, filling out a hundred forms about my graduate school experience, and setting up my meeting to officially submit my thesis (tomorrow at 10am!), I spent a few hours pimping up this blog. You like? Suggestions anyone?

I also thought and thought about what to write for this post. I know I have been trying to advocate local and seasonal recipes here on CCT, and as much as I try to eat locally and seasonally, I have a little confession everyone. Here goes...I eat apples. Every. Single. Day. Of the year. Just about. Fall? Yes, of course. Winter? Sure, cold storage apples are pretty awesome too. But then, I also eat apples in the spring...and summer (gasp!). Not sure why -- just trying to keep the doctor away, I guess.

And hence, the apples in the background of this picture. But here's the thing about this recipe...it doesn't call for apples, it calls for applesauce. So even if you abide by all the local and seasonal rules, you can still enjoy this cake all year long.

I'm not sure what prompted me to make this very autumn-esque cake in the middle of June. I was craving something sweet and spicy and nutty, and this just fit the bill. Maybe it was the countless number of yummy looking cake recipes I've been seeing on Grace's lovely site. Maybe I was just longing for Fall. Maybe I'm trying to use up what seems like hundreds of jars of Trader Joe's applesauce before I prepare for my big move across the country. Whatever the reason, I made this cake, and it made me happy.

Applesauce Spice Cake with Cream Cheese Frosting (adapted from Joy of Cooking, makes about 12 servings)

*This cake was very spicy and moist, but a bit dense. I think next time I will increase the oil to 1/2 cup and reduce the flour by about 1/4 cup.

For cake:
1 cup sifted all-purpose flour
1 cup sifted whole wheat flour
1 teaspoon baking soda
1 teaspoon ground cinnamon
1/2 teaspoon ground cloves
1/2 teaspoon ground allspice
1/2 teaspoon salt
1/3 cup oil (I used canola)
1 cup packed brown sugar
1 large egg
1/4 cup buttermilk or yogurt (I used a mix)
1 cup unsweetened applesauce
1 cup chopped walnuts

For Cream Cheese Frosting:
1 8oz package cream cheese
2 tablespoons softened butter
1 cup confectioners' sugar, sifted
1/2 teaspoon vanilla extract

To make cake:
1. Preheat oven to 350F. Grease and flour an 8-inch square baking pan.
2. In a large bowl, whisk together the sifted flours, baking soda, cinnamon, cloves, allspice, and salt.
3. In a separate bowl, using a mixer on high speed, beat together the oil and sugar for about 3 minutes.
4. Set the speed to low, and beat in the egg. Stir in the flour mixture in 3 parts, alternating with the applesauce. Do not overmix. Finally, stir in the walnuts.
5. Scrape batter into pan and spread evenly. Bake for 25-30 minutes or until a toothpick inserted into the center comes out clean. Once cool, top with cream cheese frosting.

To make frosting:
In a large bowl, cream together cream cheese and butter until creamy. Gradually beat in the sugar until smooth. Beat in vanilla extract.

Sunday, June 13, 2010

(Lighter) Spinach Artichoke Dip

I can't even remember the last time I've had spinach artichoke dip at a restaurant - it must have been at least 10 years ago. So I guess I can't completely attest that this version of the popular dip will be exactly like the kind you find at the restaurants, but I will say that this dip is truly delicious.

The flavors of this dip are so robust. The tart from the sour cream and the salty from the cheeses create a delicious contrast; the spinach and artichoke play so well together, you almost want to give them an award.

Below is my lightened version of this classic dip, which I think is just as good as the full-fat version. I say "lightened" instead of "light" because this dip is still rich, creamy, and cheesy. Use it as an accompaniment for bread, crackers, and carrot sticks, or do what I do: slather it on two pieces of good wholesome bread, add some sliced tomato, and call it lunch.

(Lighter) Spinach Artichoke Dip

* 1 1/2 cups thawed, chopped frozen artichoke hearts
* 1 cup thawed, chopped frozen spinach
* 1/2 cup sour cream (I use low-fat)
* 1/2 cup cream cheese, softened
* 1/4 cup grated Parmesan or Pecorino cheese (or combination of the two)
* 4 cloves garlic, chopped
* 1/2 cup grated mozzarella cheese

1. Preheat oven to 375 degrees F (190 degrees C).
2. In a 8x8 inch baking dish*, mix together artichoke hearts, spinach, sour cream, cream cheese, parmesan and pecorino cheese, and garlic.
3. Bake until heated through and bubbly, about 20 minutes.
4. Remove dish from oven and set oven to broil. Spread an even layer of mozzarella cheese over the top. Return to oven and broil until top is lightly browned and bubbly.
5. Cool for 5 minutes before serving.

*I baked this is a 8x8 inch dish and later transferred some to ramekins shown in the photos.

Wednesday, June 9, 2010

Whole Wheat Focaccia


I think I've had this blank document up for about 2 hours now, trying to write this post. In the meantime, I've read the news, listened to a Christmas song, bought new running sneakers, and watched an episode of Sex and City (why, oh why can't the movies be as good as the show??). But write this post I did not. So since I could not come up with anything to write, I decided to write about how I could not come up with anything to write.

Truth is, I think I'm all writed-out. Yesterday, after weeks months of writing, editing, writing, editing, and even more writing and editing, I FINALLY submitted my thesis. Hallelujah is all I can say. For now that is. Until my committee members read it, find a million things wrong with it, and ask me to re-write it, edit it, rewrite it and edit...(please pray for me that this doesn't happen).


I now have a new respect for book writers and editors. How do they do it? More times than I'd like to admit, I'd get ready to proofread, red pen in hand, only to find myself...asleep. Face down. On my thesis. With a red ink stain on my cheek.

Don't get me wrong, I am in no way putting down my writing or my research, it's all very interesting (to me at least), but I find few things more boring than reading and re-reading something that I have written, read and re-read about a gazillion times. I'm just saying.

I have been wanting to post about this recipe for a while now - ever since Nancy was here (yes, that long!). It's probably the simplest yeast bread you can make and super tasty. The best thing about it, is the countless ways to flavor it with various combinations of herbs, cheese, and other fixin's: thyme and roasted garlic, caramelized onions and gruyere, or whatever else you fancy. This bread is a palette for your culinary imagination. Start painting!


Whole Wheat Focaccia Bread (adapted from allrecipes)

1 tablespoon honey
2 cups warm water
1 tablespoon active dry yeast
1 tablespoon kosher salt
1 tablespoon extra-virgin olive oil
1/2 cup diced onion

3 cups all-purpose flour, plus a bit more as needed
2 cups whole wheat flour
3 tablespoons extra-virgin olive oil
2 tablespoons fresh chopped rosemary
1/4 cup freshly grated Parmesan cheese
1 tablespoon kosher salt

1. In a large bowl, dissolve honey in the warm water, then sprinkle yeast over the top. Let stand for 5 minutes until the yeast softens and begins to foam. Stir in 1 tablespoon of salt, 1 tablespoon olive oil, onions, and flour and form into a dough. Knead on a well floured surface until smooth and elastic, about 5 minutes.
2. Lightly oil a large bowl, place the dough in the bowl and turn to coat with oil. Cover with a damp cloth and let rise in a warm place until doubled in volume, about 20 minutes.
3. Preheat oven to 415 degrees F (215 degrees C).
4. Place dough onto oiled baking sheet, and flatten to cover the whole sheet evenly. Use the tips of your fingers to make indentations all over the dough spaced about 1 inch apart (I forgot to do this). Drizzle the focaccia with 3 tablespoons olive oil, then sprinkle rosemary, Parmesan cheese, and remaining 1 tablespoon of kosher salt over the top. Let rise for 10 minutes.
4. Bake in preheated oven 20 minutes until golden brown.

Thursday, May 27, 2010

Daring Bakers Piece Montée (Croquembouche)

The May 2010 Daring Bakers’ challenge was hosted by Cat of Little Miss Cupcake. Cat challenged everyone to make a piece montée, or croquembouche, based on recipes from Peter Kump’s Baking School in Manhattan and Nick Malgieri.

I wanted to make this dessert for one of my best friends (hi Nancy!) who was visiting a few weekends ago and my goal was to minimize the amount of work I had while she was here. Since there were several steps to this recipe, I started early -- made the pastry cream 3 days in advance, baked the pâte à choux the day before, and filled and froze them overnight. The next day, I assembled the Croqembouche while the choux were still frozen. I think freezing them actually made the assembly easier. The choux were much easier to handle, and the glaze hardened quickly which helped them stick together. Nancy is a fan of fruity desserts and chocolate, so I filled the choux with a banana pastry cream and assembled the Croquembouche with a chocolate glaze.


I had never made a pâte à choux before but had been longing to try it for some time. Cat's recipe for the choux was absolutely perfect. These little babies puffed up so beautifully I almost couldn't believe I actually made them. I ate one right out of the oven - no filling, no frosting, completely unadorned, and it was simply amazing. Like the most delicious fluffy little pillow you could ever eat.


For the pastry cream, I started with Kat's recipe for vanilla pastry cream, reduced the sugar a bit, and added a mashed banana. The cream was good but not spectacular. It was a bit too sweet and not very flavorful. I scraped in some vanilla beans, which helped enhance the flavor a bit, but I still wasn't in love. I would have preferred a creamier, maybe even gooier, filling for the choux.


Assembling the Croquembouche was probably the step I was most intimidated by, but it actually turned out to be much simpler than I had imagined. As I mentioned, I think working with frozen choux made it much simpler, and my Croquembouche came together pretty easily.

All in all, I really enjoyed making, and even more so eating, this dessert. Cat's pâte à choux recipe has opened up a world of possibilities -- I've been dreaming about eclairs, cream puffs, and profiteroles. This will be my go-to recipe the next time I want to make a pâte à choux, and there definitely will be a next time.

Piece Montée (Croquembouche)

For the Banana Crème Patissiere:
*1 cup (225 ml) whole milk
*2 tablespoons cornstarch
*6 tablespoons (100 g) sugar
*1 large egg
*2 large egg yolks
*1 small banana, mashed
*2 tablespoons (30 g) unsalted butter
*1/2 teaspoon vanilla extract
*1/2 vanilla bean, split lengthwise

Dissolve cornstarch in ¼ cup of milk. Combine the remaining milk with the sugar in a saucepan; bring to boil; remove from heat.

Beat the whole egg, then the yolks into the cornstarch mixture. Pour 1/3 of boiling milk into the egg mixture, whisking constantly so that the eggs do not begin to cook.

Return the remaining milk to boil. Pour in the hot egg mixture in a stream, continuing whisking.

Continue whisking (this is important – you do not want the eggs to solidify/cook) until the cream thickens and comes to a boil. Remove from heat and stir in the mashed banana, then beat in the butter and vanilla extract. Scrape the seeds from the vanilla bean and stir in to combine. Finally, for a smooth consistency, strain the creme through a sieve.

For the Pate a Choux (Yield: About 28)
*¾ cup (175 ml.) water
*6 Tbsp. (85 g.) unsalted butter
*¼ Tsp. salt
*1 Tbsp. sugar
*1 cup (125 g.) all-purpose flour
*4 large eggs

For Egg Wash:
*1 egg and pinch of salt ( Instead of egg wash, I brushed the choux with a bit of milk)

Pre-heat oven to 425◦F/220◦C degrees. Line two baking sheets with parchment paper.

To prepare batter: 1. Combine water, butter, salt and sugar in a saucepan over medium heat. Bring to a boil and stir occasionally. At boil, remove from heat and sift in the flour, stirring to combine completely. Return to heat and cook, stirring constantly until the batter dries slightly and begins to pull away from the sides of the pan. Transfer to a bowl and stir with a wooden spoon 1 minute to cool slightly. Add 1 egg. The batter will appear loose and shiny. As you stir, the batter will become dry-looking like lightly buttered mashed potatoes. It is at this point that you will add in the next egg. Repeat until you have incorporated all the eggs.

To Pipe:
Transfer batter to a pastry bag fitted with a large open tip (I piped directly from the bag opening without a tip). Pipe choux about 1 inch-part in the baking sheets. Choux should be about 1 inch high about 1 inch wide. Using a clean finger dipped in hot water, gently press down on any tips that have formed on the top of choux when piping. You want them to retain their ball shape, but be smoothly curved on top.

Brush tops with egg wash (1 egg lightly beaten with pinch of salt) or milk.

To Bake:
Bake the choux at 425◦F/220◦C degrees until well-puffed and turning lightly golden in color, about 10 minutes.

Lower the temperature to 350◦F/180◦C degrees and continue baking until well-colored and dry, about 20 minutes more. Remove to a rack and cool.

Can be stored in a airtight box overnight.

To Fill:
When you are ready to assemble your piece montée, using a plain pastry tip, pierce the bottom of each choux. Fill the choux with pastry cream using either the same tip or a star tip, and place on a paper-lined sheet. Choux can be refrigerated briefly at this point while you make your glaze.


For Chocolate Glaze:

*8 ounces/200 g. finely chopped semi or bitter sweet chocolate (use the finest quality you can afford as the taste will be quite pronounced)

Melt chocolate in microwave or double boiler. Stir at regular intervals to avoid burning. Use immediately.

Assembling the Piece Montée:
You may want to lay out your unfilled, unglazed choux in a practice design to get a feel for how to assemble the final dessert. For example, if making a conical shape, trace a circle (no bigger than 8 inches) on a piece of parchment to use as a pattern. Then take some of the larger choux and assemble them in the circle for the bottom layer. Practice seeing which pieces fit together best.

Once you are ready to assemble your piece montée, dip the top of each choux in your glaze (careful it may be still hot!), and start assembling on your cake board/plate/sheet. Continue dipping and adding choux in levels using the glaze to hold them together as you build up.